April 2024

New Feature

New Integration for InfoFlo Print

infoflo print logo

Software: InfoFlo Print

Automation: API Integration

Are you running your business on InfoFlo Print? Now you can automate your feedback and review process with the LoyaltyLoop-InfoFlo Print integration, and it's FREE! Using the Add-On provides a new level of simplicity to gather customer feedback following an InfoFlo Print shipment or sale.

InfoFlo Print gives customers the added flexibility to choose whether to trigger the survey based on a shipped order, or a paid invoice. Once triggered, the contact associated with that transaction gets sent to LoyaltyLoop daily.

By using this free integration, not only is there no effort to get contacts to-be surveyed into your LoyaltyLoop, but your survey can be sent to customers as soon as the next day, or soon thereafter (per your settings). Requesting feedback and reviews closer to when the customer experienced your business can increase both the quality and quantity of responses.

By default, the Add-On will send your surveys on a weekly basis on Tuesdays and impose a 3-day delay to give the customer time to experience your products and services. You can increase that frequency to daily with no delay, or adjust it otherwise, by contacting our support team.

Key Advantages of the InfoFlo Print Integration Add-On are:

  • Set it and forget it!
  • Engage the customer soon after their transaction
  • Send requests as often as daily
  • Save time (and money) not running report queries

It takes seconds to connect InfoFlo Print to LoyaltyLoop to use this free integration. Find the simple steps on our InfoFlo Print Integration Add-On page.


New Feature

New Integration for Field Routes

field routes logo

Software: Field Routes

Automation: API Integration

If you have a pest control, lawn or pool services company running FieldRoutes, it's never been easier to automatically engage customers for feedback and reviews. Our new Integration Add-On for FieldRoutes adds $0 (FREE!) to your LoyaltyLoop subscription yet automates your feedback and review process.
Instead of manually exporting and uploading (or emailing) transaction contacts, or triggering a review request one at a time, this Add-On automatically sends your FieldRoutes contacts to your LoyaltyLoop.

When the services appointment is completed, the contact associated with that transaction gets sent to LoyaltyLoop daily, putting you in position to request feedback and reviews as soon as the next day.

Requesting feedback request closer to when the customer experienced your services can increase both the quality and quantity of responses.

By default, the Add-On will send your surveys on a weekly basis on Tuesdays and impose a 3-day delay to give the customer time to experience your service. You can increase that frequency to daily with no delay, or adjust it otherwise, by contacting our support team.

Key Advantages of the FieldRoutes Integration Add-On include:

  • Set it and forget it!
  • Engage the customer soon after their transaction
  • Send requests as often as daily
  • Save time (and money) not running report queries

It takes seconds to connect FieldRoutes to LoyaltyLoop. Follow the simple steps on our FieldRoutes Integration Add-On page.


Tip

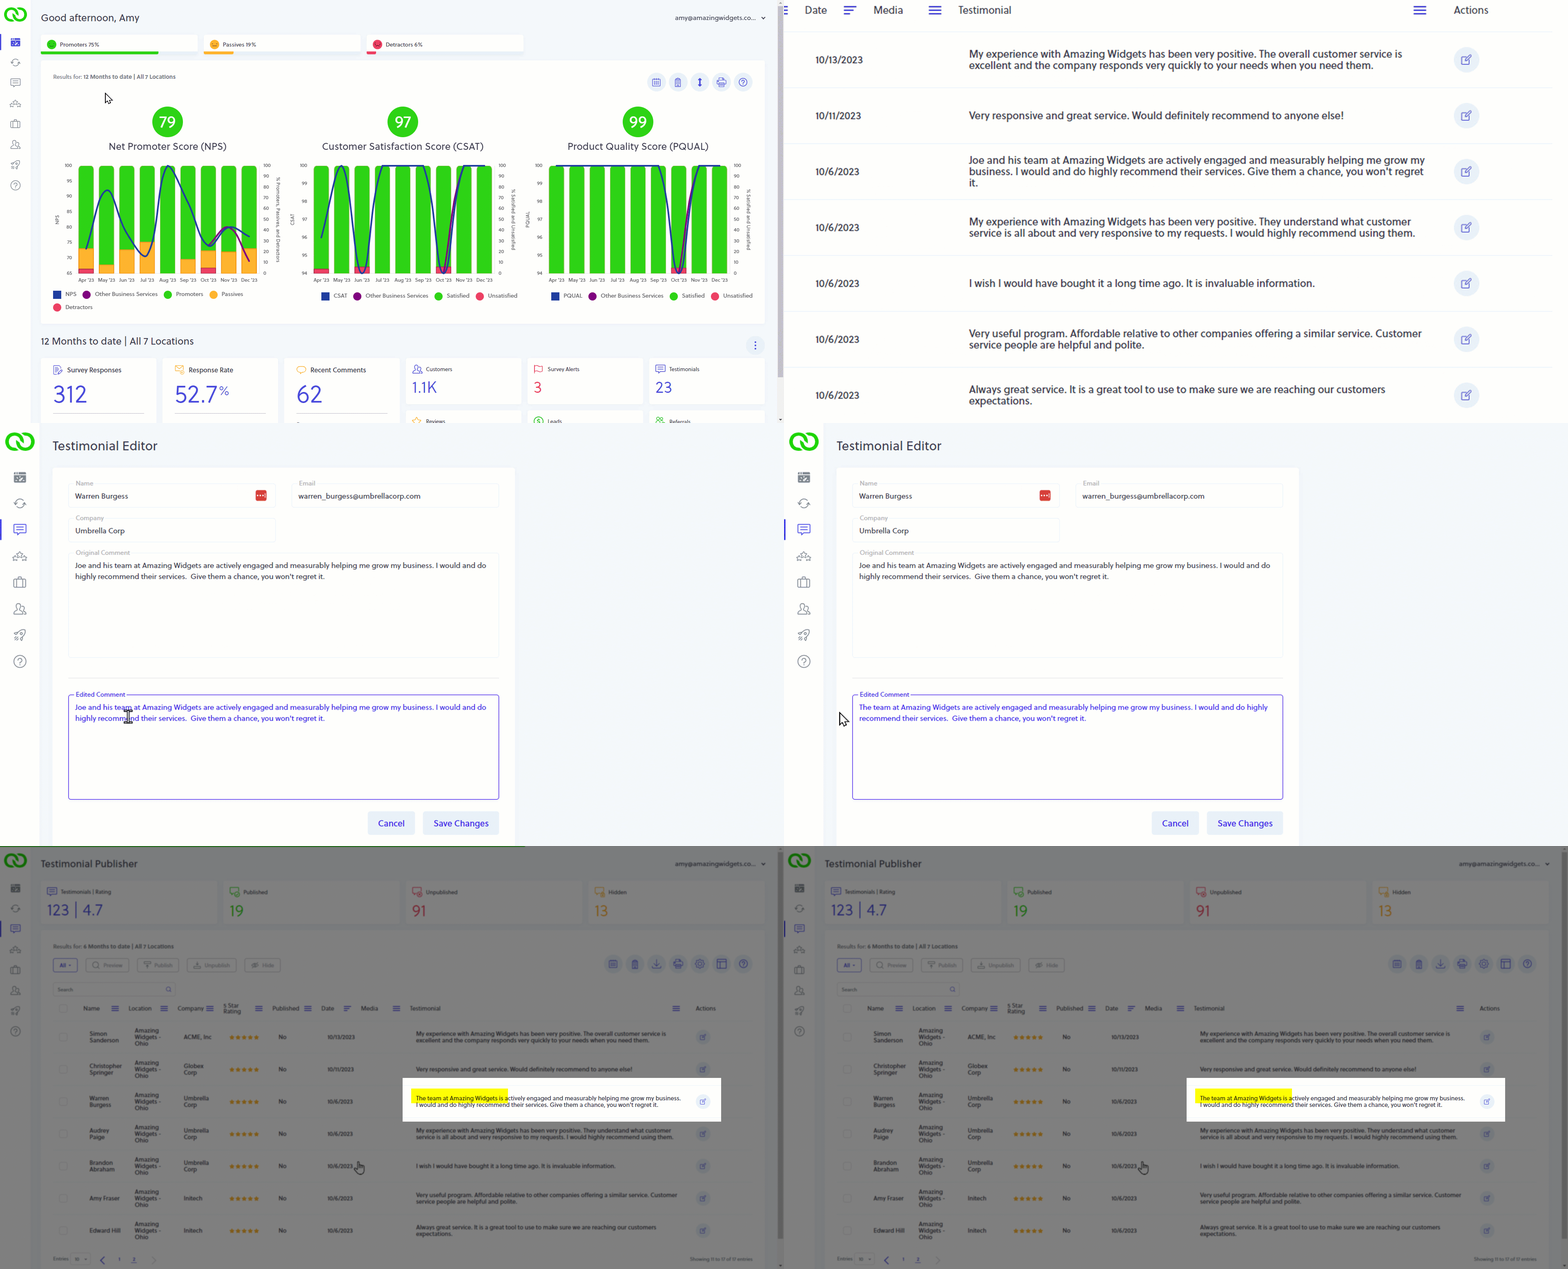
Did you know you can edit testimonials? Do you know why you might want to?

Using the Testimonial Publisher feature in LoyaltyLoop is a powerful way to promote why customers love working with you and your business. It only takes seconds to publish your testimonials to your website or social channels. But did you realize you can edit your testimonials? With the power to edit comes great responsibility. In this post we'll discuss the use cases when you may want to edit testimonials, and the pitfall of abusing this power.

Part of your LoyaltyLoop survey allows customers to express themselves openly and freely via comments they provide to you. When customers also give you permission to use their comments in your marketing, these comments become your testimonials that can be published via LoyaltyLoop to your website and social channels and used in your other marketing.

The very nature of providing open-ended comments is to allow the customer to speak freely. For this reason, LoyaltyLoop gives you the capability to edit your testimonials before they appear in public. We let you edit anything.

Correct Use of Editing Testimonials

The only edits you should make to a customer's testimonials are those relating to mistakes or privacy. The proper use of editing includes fixing typos, punctuation and perhaps grammar. In addition, depending on your company policies, it may be appropriate to remove references to the names of employees.

  • Misspelling: "Loyalty loop" corrected to "LoyaltyLoop"
  • Typo: "fantastc" corrected to "fanstasic"
  • Privacy: "Judy and the team are great..." corrected to "The team is great..."

Incorrect Use of Editing Testimonials

You should never change the customer's intent or sentiment of their comment. How would you feel if you gave feedback to a company you work with, and when you read it online, they changed your sentiment? For example, if a customer wrote:

While my orders are delivered mostly in a timely manner, they constantly require rework causing delays and frustration.

It would be inappropriate to edit the comment to read:

My orders are delivered in a timely manner.

Do you think you'd continue doing business with a company that would do that? I wouldn't. In short, a good edit to a testimonial makes it appear more professional by fixing spelling mistakes and grammar and does not change the customer's intent.

How To Edit Testimonials

loyaltyloop edit testimonials
Learn

Leveraging Net Promoter ScoreSM in Your Business

Section 4: Measuring NPS®. Down to the data.

chris counts photo

Photo by Chris Counts on Unsplash

In the prior posts covering our latest whitepaper, "Leveraging Net Promoter Score in Your Business", we have covered the history of customer loyalty surveys, how the industry came to use NPS, and what NPS is. Now it is time to calculate it!
To start, we need some data. The data we need is collected through surveys, usually via email using the question (slightly updated from Reichheld’s original version) “How likely is it that you would recommend Your Company/Brand to a friend or family member?”

The people who fill out the survey are called respondents. When asked this question, respondents are presented with a scale of options from which to choose. Scales can vary, but the traditional one is a numeric scale ranging from 0 to 10 with 0 being “Very Unlikely to Recommend” and 10 being “Very Likely to Recommend.” Pictured below are three example scales: 11 numbers, 5 phrases, 3 emojis.

Now for some more definitions:

Detractors

On the traditional 0 to 10 scale, people who choose a number from 0 to 6 are called “detractors.” Reichheld calls this group detractors, because he found they typically represent over 80% of the negative word-of-mouth comments that push potential new customers away and demoralize employees. Detractors are customers who likely had a bad experience with your business. They generally have negative feelings and would not put their reputation on the line to recommend you.

Passives

Those who indicate they are only likely to recommend you by selecting a 7 or 8 are considered “passives.” They have fairly neutral feelings toward your business and might be repeat customers, but no guarantees. These customers are more likely to drift toward competitors when presented with better offers.

Promoters

Here is the fun part – people who select a number 9 or 10 are your “promoters.” These are your super fans who love your brand and are likely to be your repeat buyers. They will give you glowing reviews and testimonials. According to Reichheld’s research, these customers have the highest rate of repeat purchases and represent over 80% of referrals. Keep them happy and they will remain loyal, and will tell others about your business, creating a cycle of growing, loyal, repeat customers!

Formula to Calculate Net Promoter Score

Net Promoter Score is calculated using the below formula:

NPS = %Promoters - %Detractors x 100

The results will be a whole number from -100 to +100.

Let’s look at an example and calculate NPS. Here we can see the promoters, passives, and detractors.

Name Score Behavior Category
Charles 9 Promoter
Sam 4 Detractor
Nicole 7 Passive
John 10 Promoter
Mary 8 Passive

NPS Calculations

Promoters = 2 (Charles and John)

Detractors = 1 (Sam)

Passives = 2 (Nicole and Mary)

Total NPS Respondents = 5

NPS = ( %Promoters - % Detractors ) x 100

NPS = ((2/5) - (1/5)) x 100

NPS = (40% - 20%) x 100

NPS = 20% x 100 = 20

NPS = 20

Notice that Passives are included in the NPS calculation only as part of the total number of respondents. These customers are on the fence relative to how they feel about your business, and you should take them into account because they could be turned into promoters (or detractors)!

Interpreting NPS

NPS ranges from -100 to +100. Your objective is to improve your NPS over time. The key to achieving improvements to your NPS is to measure it regularly and compare how your business is performing over time. Customer needs and wants are always changing, so you need to change with them to maintain their loyalty.

It is important to recognize that your goal is not a perfect 100, but rather continuous improvement. Japanese culture has a word for this, which is Kaizen. Kaizen is the philosophy and practice of making small incremental improvements, in both life and business, that result in major changes over time.

When applied to business, your goal is to collect feedback that affords you the opportunity to make small changes that improve your business, and hence improve your NPS. When these small improvements are made continually, your business and brand are boosted in a significant way.

Other considerations to calculating NPS

Collection method – NPS surveys are typically sent via email to past customers. You can also include it as a pop-up on your website, or via a dashboard notification if that applies to your business. You can use a survey service to send out email and text (SMS) surveys automatically based on set parameters.

Scale selection – We covered the 0 to 10 scale, but there are many options. Other common scales include a 5-phrase scale which does not use numbers but phrases ranging from “Very Unlikely” to “Very Likely.” The fewer options are convenient for the respondent, but there is only one Promoter choice - which means those few respondents who never give a “top box” score will appear as Passive. There is also a 3 emoji, which displays three emoji style options representing Unhappy/Detractors, Neutral/Passives, and Happy/Promoters. This scale is easy on the customer but does not provide a depth of information. The general rule of thumb about scale selection is to pick one and stick with it. This ensures historical comparisons of your NPS are valid.

How often to measure – Best practices say to survey the customer regularly throughout their journey with your business, at the appropriate customer interactions (aka “touch points”) and using a method that prevents the same person from receiving the survey too often. How often is only a question you can answer for your business. For some businesses, it might be right to ask the same customer every single time they make a purchase, whereas others might feel it appropriate to ask the same customer for feedback every 90 days when ordering regularly.

Collecting written feedback after “the question” – Regardless of how the respondent answered the NPS question, it is critical to ask why they answered the way they did. Allowing respondents to share their comments openly and freely, is crucial to your understanding. Comments from Passives and Detractors help you understand what went wrong so that you can remedy the situation. For Promoters, gathering positive comments which can serve as testimonials can be used to help attract potential customers in the future.

Tune in next month for the next section from our latest whitepaper “Leveraging Net Promoter Score in Your Business”.


Tip

Marketing Ideas for Printers: Add Testimonials & Survey Web Customers

marketing ideas for printers

Easily Capture and Share Your Customer Testimonials

If your print business is using a website from the team at Marketing Ideas for Printers (MI4P) you will love how easy it is to engage your web order customers for feedback and publish your LoyaltyLoop testimonials. LoyaltyLoop is the perfect customer experience and review platform for printers and our friends at MI4P make it easy to share your customer experience success and the voice of your customers!

Publish testimonials to your Marketing Ideas for Printers website.

Testimonials are the voice of your satisfied customers, and they can be a powerful tool in influencing prospective buyers. Included with your LoyaltyLoop Promoter Plan are our powerful Testimonial Publisher widgets and badges. These widgets and badges can be customized and configured by you and added to your MI4P website homepage and testimonial section. The process is quick and easy.

  1. From LoyaltyLoop settings, configure how your testimonials appear in your widgets.
  2. Next, email your widget’s website code to the Marketing Ideas for Printers support team at techsupport@mi4p.com.

*Need help with your testimonial widget? Watch this short video or click here to book a call with LoyaltyLoop Support!

loyaltyloop testimonial publisher configuration

Engage your web order customers for feedback and reviews!

If your print business is utilizing your Marketing Ideas for Printers website to manage orders, you have everything you need to begin engaging your customers for feedback. LoyaltyLoop Basic and Promoter subscribers can manually upload their data file to their account utilizing Launch Pad. This 2-step process involves downloading your data from your website and then uploading it to LoyaltyLoop.

Step 1: Download report from your Marketing Ideas for Printers website. From the WorkFlow Menu Select “Completed Items” from the Categories Menu

marketing ideas for printers

Next, select the data fields to include in the report, the date range and export the file as a CSV. We recommend including the contact's email address, and all other details relating to the customer and this order. Watch this short video from Marketing Ideas for Printers on exporting from a website.

marketing ideas for printers

Step 2: Upload Data to LoyaltyLoop. When logged into your LoyaltyLoop account, click Launches from the left menu to land on your Launch Pad:

  1. Select the location (if not preselected)
  2. Select the survey (if not preselected)
  3. Drag and drop the file into the upload box
loyaltyloop launch pad

"Without the feedback you get from our customers I would be lost."

Johnny T.

Quik Print - Wichita, KS