“Using loyalty loop has been a great asset to us for staying in contact with our clients. We highly recommend them!”
No More Export Reports - Automate Your Feedback and Reviews!
If you're like most printers, busy doesn't begin to describe your world. LoyaltyLoop and PrintReach recognize this, and we are always looking to make your life a little easier. Our Integration Add-On for Printers Plan automates the process of getting your customer contact info (i.e., customers to be surveyed) into LoyaltyLoop. When you close your transactions in Printers Plan, your contacts flow automatically to your LoyaltyLoop account on a daily basis. There are no reports to run, no manual uploads, no emails to send with your files.
- Set it, and forget it!
- Engage customer soon after their transaction
- Send requests as often as daily
- Save time (and money) not running reports
The automation saves you the time, and enables you to send your feedback and review requests soon after the customer experienced your business. Instead of batching and sending all feedback requests once a month, the automation gives you the option to send requests for feedback and reviews as frequently as daily or weekly. Moving the feedback request closer to when the customer experienced your business can increase both the quality and quantity of responses.
Does LoyaltyLoop offer integrations for locally-hosted and cloud Printers Plan?
Yes. Our integration add-on supports both locally-installed/hosted and cloud-hosted Printers Plan. See the details and requirements below.
What are the requirements to use the Integration Add-On?
Cloud-hosted Printers Plan (recommended):
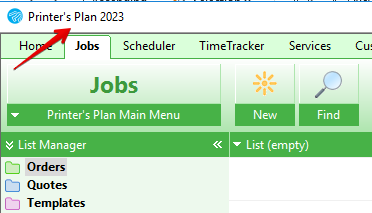
- You must be running version 2023 or higher
- You must have Printers Plan API (version 12/8/2022 or later) active. If you're unsure, please contact PrintReach support for help.
Locally-installed Printers Plan w/API:
- You must be running version 2023 or higher
- You must have Printers Plan API (version 12/8/2022 or later) active
- The local computer running Printers Plan must be turned on
- Your local network must be configured to allow LoyaltyLoop access through firewalls, and to a specific port. You would then use the guidelines for enabling the integration to cloud-hosted Printers Plan.
This option will NOT work if your network is not configured correctly. Implementing this option will likely require your seeking support from your IT staff. Every network is different, and LoyaltyLoop can only provide limited assistance to you when attempting to use this option. We suggest your IT staff contact our Support Team first. We also recommend your IT team configure your local network to allow LoyaltyLoop access to a high port that is not commonly used (e.g. above port 1024), and the port is set to use encryption.
How much does it cost?
There is no additional cost to your LoyaltyLoop subscription.
If locally-hosted and you do not have the Printers Plan API, please contact your PrintReach account manager pricing.
How do I enable the Integration for cloud-hosted Printers Plan?
For new customers, we will help you set up the integration during your Onboarding call. For existing customers, we recommend booking a support session with us requesting the integration, and we'll set it up together with you. When you engage us, LoyaltyLoop will contact Print Reach on your behalf to gather your specific Printers Plan Host.
If you are trying to set up the integration on your own, follow these step:
- Open Notepad or another editor to be in position to copy and save a few things for future steps.
- Contact Print Reach Support to request your Printers Plan hostname. (This is your "Host" and "Path Prefix" for step 7 below).
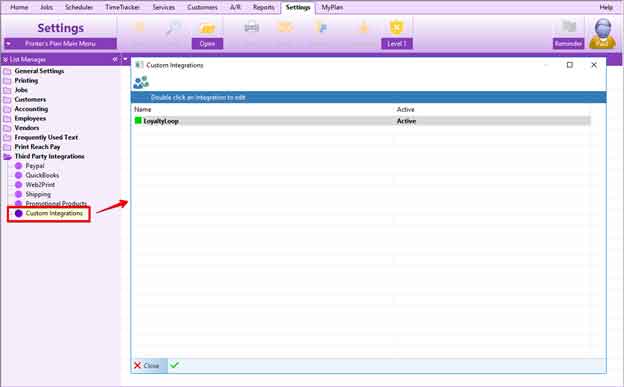
- Navigate to the Settings tab and open the Third Party Integrations folder, then select Custom Integrations. In the Custom Integrations window double-click on LoyaltyLoop.
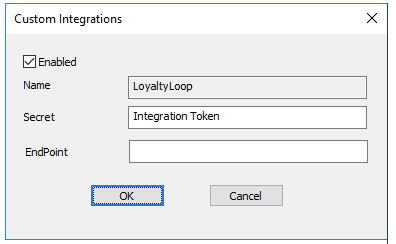
- After double-clicking LoyaltyLoop in the Customer Integrations window, the below window appear. Make sure the Enabled box is checked, and enter any string of characters (save it to Notepad) for your Secret - (This is your "API Token" for step 7 below.) Leave EndPoint blank, as it is not used for the LoyaltyLoop integration. Then, click OK.
- Sign in to LoyaltyLoop as an Admin User, then go to Settings
- If you have more than 1 location, click the location. Under Data Management, click Integrations, then click the plus (+) button, and select Printers Plan from the drop-down
- From the values you saved to Notepad,
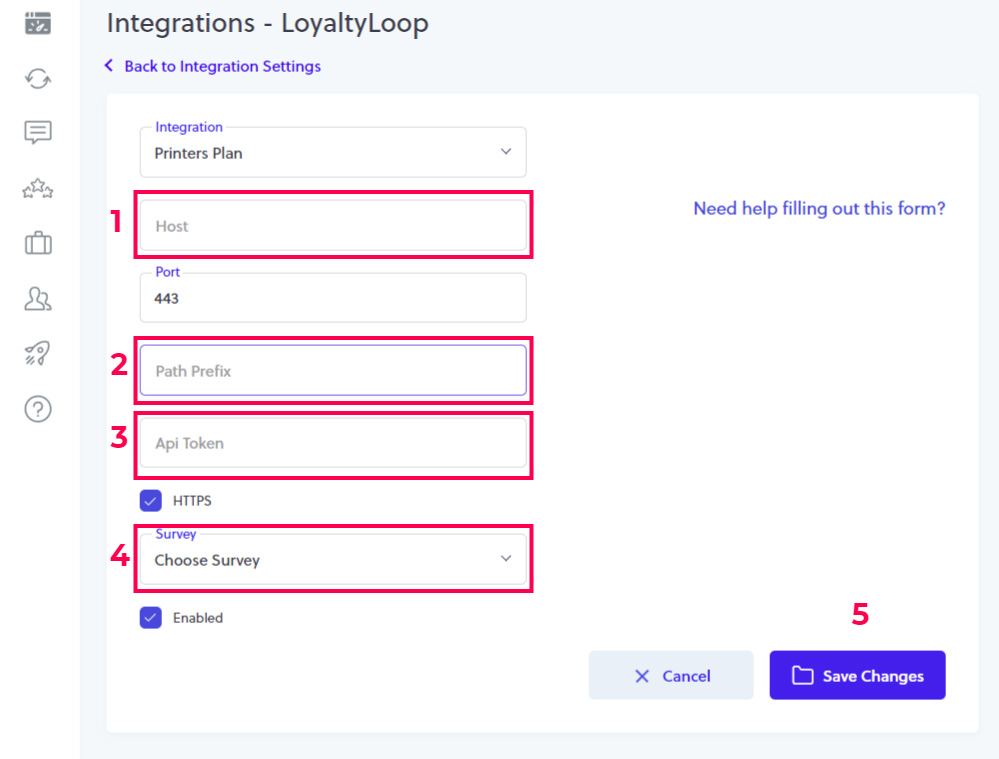
(1) Paste your "Host" (for "https://hosted.printersplan.com/your_location" you would only paste "hosted.printersplan.com");
(2) Paste your "Path Prefix", which is everything after the "/" in the Printers Plan hostname you received from PrintReach (for "https://hosted.printersplan.com/your_location" you would only paste "your_location");
(3) paste your "API Token";
(4) select your survey (if not pre-selected);
(5) click Save Changes. Use the default selection for "Port", or contact your Printers Plan administrator for your port number. - You LoyaltyLoop is now connected to your Printers Plan
How does the integration behave?
LoyaltyLoop will only get transaction contact data for Printers Plan Jobs where the DateShipped is set. LoyaltyLoop will pull the last 30-days of transaction data when the integration is first connected. Every day thereafter, LoyaltyLoop will only pull the new transaction data since the last time it connected to Printers Plan.
Which Printers Plan fields are included with the Integration Add-On?
- First
- Last
- Title
- Phone
- Cell
- CusNo
- Location
- Company Name
- Address
- Address2
- City
- State
- Zip
- DateIn
- Job Number
- Job Title
- DateShipped
- CSR
- Sales Rep
- Total
*** Coming Soon ***
- Customer Tags
- Contact Tags
- Order Tags
Can I impose a standard delay when sending my survey?
Yes. To ensure your customer has had the appropriate amount of time to experience your product or service, you can impose a delay on sending your survey. As stated below, we will set a 3-day delay on the default launch configuration. If you prefer something else, please contact our support team at support@loyaltyloop.com, or 888-552-5667 option 3. Here's a blog post explaining imposed launch delays.
How do I change my survey send (launch) frequency?
With the integration enabled, your data flows to LoyaltyLoop as you close transactions. You are now in position to have your surveys sent soon after the customer experiences your business.
By default, and unless you specify otherwise, upon activation of the integration LoyaltyLoop will reconfigure your survey launch configuration as follows:
- Weekly Launch Frequency
- Default Launching Day on Tuesday
- Imposed 3-day delay
If you'd like a different launch configuration, please contact our support team at support@loyaltyloop.com or 888-552-5667 option 3.
Your existing Touch Frequency Filter (TFF) will be maintained. For example, our default TFF is 90-days, meaning customers (based on email address) who have been asked to give you feedback within the prior 90-days (or as per your specific setting), will be removed from your launch. This prevents "over-touching" the same person too often.

