October 2024

Tip

Did you know your survey can use different themes and styles?

loyaltyloop mobile survey

Your survey can be updated to reflect your company colors, imagery and a variety of graphical elements that can keep your survey fresh and “on brand”.

The first thing to review is your choice of question scales. Choose an appropriate scale theme for your business and industry. Stylistically, if your business services consumers (B2C), you may wish to use a more fun survey theme, than if you service other business (B2B), in which case you may choose a more professional appearance.

It’s up to you. But you can choose from a variety of question scales, including simple scales, scales with label ends, star scales, emoji scales, and more. When choosing graphical scales, choose a theme that fits your brand. Combining graphics and labels can help aid respondents to quickly identify positive and negative ends of your choices. No scale will eliminate 100% of customer mistakes, but the various themes can help reduce them. Here’s another post talking about how to minimize survey errors.

As a general rule, it’s a good idea to choose a scale and stick with it, to ensure historical comparisons are meaningful. That doesn’t mean you can update it every year to keep things fresh. If you choose a scale with 5 choices, perhaps you change the graphics each year to freshen it up.

loyaltyloop mobile survey

In addition to choosing your scales, you can choose the direction of the choices, meaning good to bad, or bad to good. Some scales make more sense to scale from bad to good, such as numerical scales that run from zero to ten. But again, it’s up to you. On this page we give several examples, and our recommendations to help guide you. Depending on your scale selection, adding Scale Helper Phrases in your questions can also be helpful to your respondents.

Now that you have your scales chosen, look at the overall appearance of your survey. In all likelihood, your survey was designed to resemble your website, at the time your survey was created. If your brand and web appearance has evolved, consider having us update your survey to reflect your current motif. Colors, fonts, and imagery can all aid your customer in their survey experience.

Lastly, view your survey on your phone to ensure it renders as expected. All of our new surveys are mobile-friendly, but if you’ve been a customer for a while, it’s always a good idea to view your survey on all typical devices, then request adjustments that don’t appear as mobile-friendly as our newer survey designs.


Tip

Did you know the sender of your LoyaltyLoop emails can be set dynamically?

Depending on the nature of your specific business, you may wish to have your requests for feedback or reviews be penned and sent from specific staff associated with that customer. Since feedback typically rises to the level of the person asking, we always recommend someone senior in your company be the person penning and requesting feedback. That being said, it is completely up to you, and if you have a need to vary the requester, here is how to do it.

As a LoyaltyLoop user, you’re probably already familiar with Signature Templates. This feature allows you to create various signatures for various “senders”, and by adding the {{signature}} template tag to your emails, those can be used as the senders of your emails and their signatures are displayed to your survey recipients. But this feature creates static signatures. You can also create dynamic signatures that vary based on details associated with your survey launch data.

Let’s look at an email of dynamic senders & signatures. The table below represents an example of “launch data” that you might upload, email or automatically flow into your LoyaltyLoop account via one of our integrations. In this example, you see 4 columns titled “gm_email”, “gm_name”, “gm_title” and “gm_phone”, representing the contact details of the General Manager who is associated with that particular customer. We will configure LoyaltyLoop to dynamically send the survey and review requests from the specific GM associated with each customer on each row.

Keep in mind that you can include any details in your launch data that is relevant to your business. Perhaps your business wants the requests to come from the sale representative, the product manager, or the branch manager. All of those options and more, can be accommodated in the same way.

customer_email first_name last_name company gm_email gm_name gm_title gm_phone
jane@anycompany.com Jane Doe Any Company bwilson@xyzcorp.com Bill Wilson GM, New York 888-555-1212
ann@bigcompany.com Ann Smith Big Company jscott@xyzcorp.com Janet Scott GM, Hartford 800-555-1212
kent@thecompany.com Kent Jones The Company tgrant@xyzcorp.com Trent Grant GM, Newark 888-555-1111

Just like creating static signatures, you will create a new signature but will replace specific values with tags that represent the values found in your launch data. When the emails are generated by LoyaltyLoop, or Thank You pages are rendered, the tags get replaced with the values in your launch data.

From within the signature editor, notice the drop-down menu under the tag icon loyaltyloop tag iconcontaining all your unique Launch Data Tags that come from your actual launch data. Using the above table for this example, you would see Launch Data Tags for GM Email, GM Name, GM Title, and GM Phone.

Simply place your cursor in the spot in the signature where you want to insert the Launch Data Tag, and click that tag from the drop-down menu. The tag will look something like this, {{gm_email}}, {{gm_name}}, {{gm_title}}, {{gm_phone}}. You can copy and paste the tags anywhere in the email or Thank You page. You can even insert a tag in place of the Sender’s Name and Email Address, and in the Subject line. An example of what a dynamic signature would look like is below on the right.

loyaltyloop dynamic signatures

Once you’ve saved your new dynamic signature, go to the emails and pages where you want to use it. Make certain the signature tag, {{signature} is inserted into your emails, and you’ve selected the correct signature that you just created. Where tags are used, they'll be inserted into the email or page settings. Lastly, remember to save your changes. Update each email and Thank You page where you wish to use the dynamic signature.

That’s it. Now when your survey launches, that actual values associated with that customer in your launch data (i.e. the columns containing the GM’s name, email, etc.) will be inserted where you placed the tags. This advanced functionality gives you new ways to personalize, and tailor, your surveys and review requests to fit your exacting business needs.

Need Help? Are you interested in this feature, but not sure if you can set it up on your own? Don't worry. Just give our support team a call or drop us an email. Reach us at support@loyaltyloop.com or (888) 552-5667 option 3.


Tip

Options for minimizing customer mistakes

If you have many customers choosing the wrong end of your survey choices, it might be time to update your survey theme. While no survey will be error-proof, certain options can help reduce mistake by your respondents. Remember, if someone does make a mistake, you can easily resend them their unique survey link, so they can correct their error. Here’s how.

To reduce mistakes, let’s look at your options.

  1. If your survey choices use phrases only, check to see if both ends of the scale start with the same words. For example, some of our earlier 5-phrase surveys used the phrases “Very Satisfied” and “Very Unsatisfied”, and “Very Likely” and “Very Unlikely”. Customers reading too quickly might confuse one “Very” choice for the other. A simple solution to reduce customer mistakes is to ask us to update the wording of the most negative choices to “Not at all satisfied” and “Not at all likely”. Customers moving too quickly, while they still may make a mistake, would be less likely to pick a choice that starts with “Not” if they in fact are happy.
  2. loyaltyloop survey scales
  3. Consider adding emojis, emoticons or graphics to your choices to aid respondents in quickly identifying the ends of the scales. Take a look at the variety of scale options you have. Don't see the graphics you want, just let us know. Using emoticons may help customers quickly understand which end is positive, and which is negative.
  4. loyaltyloop survey scales
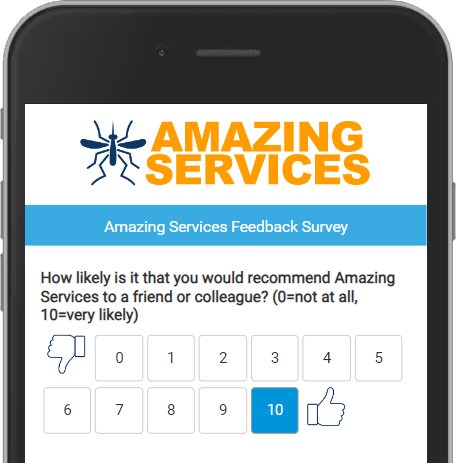
  5. Consider using the numerical scale from zero to 10, called the 11-point scale. This can be combined with emoticons or emojis, like a thumbs up or thumbs down as shown below and here. This scale is the traditional NPS® scale, and runs from 0 to 10, and that zero choice is key to reducing mistakes. Most people do not associate zero (0) as a good thing. That is not the case if your choices were to start with the number 1. Some customers may still confuse the number one as good, as in "first place" (1st place) and being a number one (e.g. “We’re #1”). When using a number scale, it can be helpful to add a parenthetical helper phrase to the end of the question. For example, if the scale is the 11-point scale we might add “(0=not at all, 10=very likely)” to the question's end.
  6. loyaltyloop survey scales
  7. If you use the 5-star scale, while it may be hard to believe, some people confuse 1-star as being the “best” or highest score. If you see your customers making mistakes, consider adding emoticons with the stars, or add emojis on the ends (frown and smile, or thumbs up/down) to aid the respondent.
  8. loyaltyloop survey scales
  9. If you see mistakes, our suggestion is to make the slightest changes first. Use the “Not” phrase variant for the most negative choice, add emoticons or emoji scale ends, or simply add a scale helper phrase to the question.

In most instances, customer mistakes represent a small percentage of respondents. But it is still good to know your options. These options are also helpful if you're looking to refresh or update the appearance of your survey, as discussed on our previous blog post this month.


Tip

Creating advanced reports using Feedback by Filter

View feedback in new insightful ways

Using Feedback by Filter can help you view customer feedback from different perspectives that can be extremely helpful and insightful. Let’s review how to use this powerful feature.

To understand this feature, you first need to understand that it is only as good as the data you upload, email or send to LoyaltyLoop via an integration. When you include other data associated with your customer’s transaction, that additional data can be used as a filter in this feature. For example, if you include the sales rep, regional manager, industry, product, SKU, or any other data associated with your customer’s translation, you can create a report of feedback based on that data element.

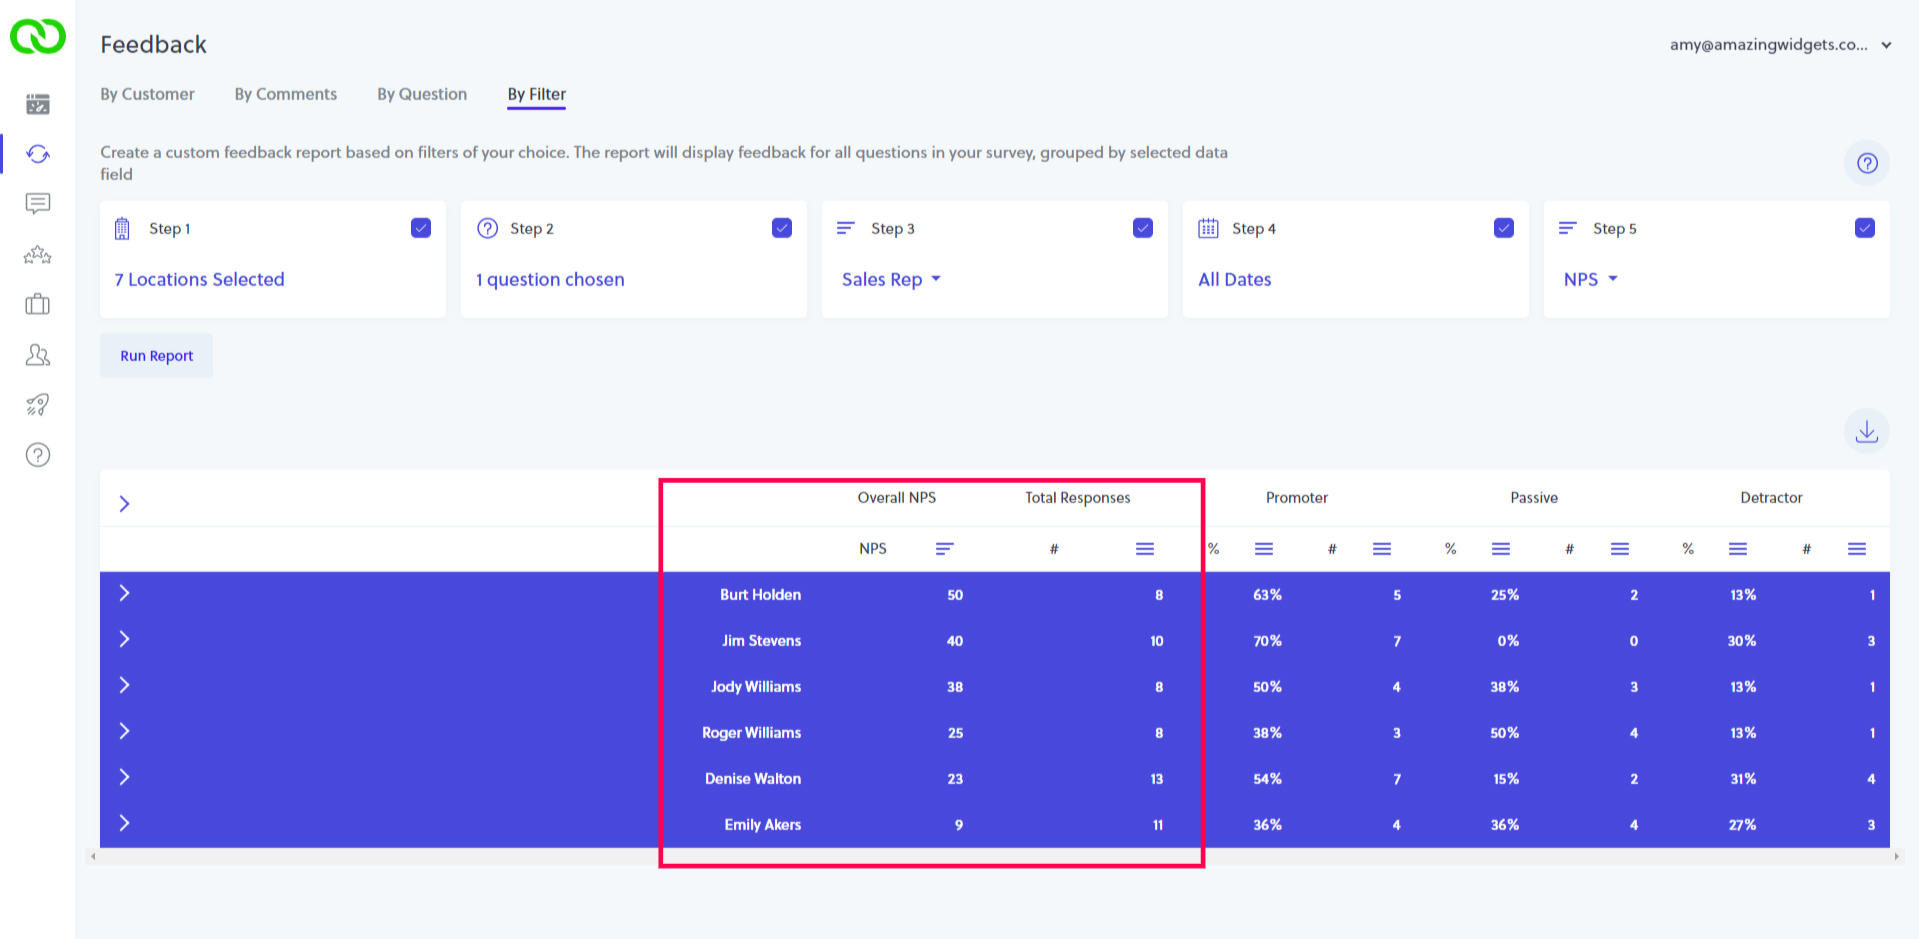
Let’s give a specific example of how you can use this powerful feature. We’ll use our fictitious company Amazing Widgets as the example. When Amazing Widgets’ data is received by LoyaltyLoop, they’ve chosen to include the Sale Rep who is associated with each customer transaction. The management of Amazing Widgets is interested to learn if there is any variation in their Net Promoter ScoreSM based on the Sales Rep managing the customer. To view this exact report, here’s what Amazing Widget users do:

Step 1: they select the location or locations they wish to view

Step 2: they select the survey question that captures the information they seek. In this specific example, the Amazing Widget team is looking to see how customers answered the NPS question, so they select that one question.

Step 3: they select “Sales Rep” from the filter. This is the key metric in the report. Again, this data is a field (typically a column) in the data set you send to LoyaltyLoop along with your customer contact details.

Step 4: they select the date range for the feedback they wish to analyze

Step 5: they choose the metric to view, either NPS or Satisfaction calculate. NPS calculation uses the formula (% Promoters) - (% Detractors), a score of -100 to +100. Satisfaction calculation uses (% Satisfied) - (% Not Sure to Unsatisfied), a score of 0% to 100%. In this example, the Amazing Widget's user chooses NPS.

When they click Run Report, they see the summary of all their Sales Reps who were associated with the customers’ survey. And each row shows the number of customers who rated Amazing Widgets on the NPS question, showing the aggregate NPS score customer’s associated with each Sales Rep. By collapsing the table, the data is more easily viewed.

feedback by filter

Look at the results. There are 6 Sales Reps, and the NPS ratings from customers vary from 50 to 9. That’s a pretty wide variation. Very quickly, management can see that the customers who rated Amazing Widgets who are managed by Emily, rated the company with a low NPS of 9. On the other hand, 8 customers managed by Burt responded to the survey, rating Amazing Widgets with a 50.

Using Feedback by Filter, you can easily identify customer feedback variation like the above example, then implement corrective actions plans for continuous improvement to drive better customer experiences.

MORE CARROT, LESS STICK!

When viewing results like NPS by Sales Rep, Support Rep, Technician and other staff-based metrics, we recommend using more “carrot” than “stick” with your team. Work to identify the ways in which under-performing staff can improve performance relative to a metric. Build continuous improvement plans based on helping under-performing staff improve, rather than using “stick” to reprimand staff.

carrots by jonathan-pielmayer

Here's a video explaining how to use Feedback by Filter

Watch this short video to compliment the written instructions below.


Tip

Understanding Your Survey Touch Frequency Filter

nathan dumlao on unsplash

Photo by Nathan Dumlao on Unsplash

A standard feature of all LoyaltyLoop surveys is our Touch Frequency Filter to ensure you engage the right customers at the right time. No one wants to get sent surveys too often, and our Touch Frequency Filter ensures this doesn’t happen.

Just as the name sounds, our Touch Frequency Filter ensures the same contact (i.e. email address or mobile number) is not “touched” or engaged too frequently, based on your specific situation. Every business is different, and how you choose to engage customers for feedback and reviews is entirely in your control with LoyaltyLoop.

The Touch Frequency Filter can be set as low as zero, no filter. This means each time the same contact shows up in your launch data, that customer will be sent a survey request. If you have very few repeat customers, or if your customers purchase on a very specific cycle (e.g. quarterly), a Touch Frequency Filter of zero may be perfectly appropriate. But if you have repeat customers that make purchase regularly, or in unpredictable ways, adding a Touch Frequency Filter is a great way to prevent your customer from getting too many requests, or survey fatigue.

Let’s take an example of a business that has a large percentage of customers who make purchases every few weeks or months, and the Touch Frequency Filter is set to 90-days. Each time a survey is processed for launch, whether the manually uploaded via the Launch Pad, sent to us via your Launch File Email Address, or via an integration, LoyaltyLoop will evaluate each contact against the filter. If that contact has been sent your survey in the prior 90-days, that contact will be skipped for this launch. In this example, repeat customers will have an opportunity to give feedback appropriately every 90-days, or 4 times per year, when buying regularly.

Remember, the Touch Frequency Filter is set on a specific survey, but is evaluated per contact. Since not all customers will purchase on the same date, this allows you to survey samples of customers, all of whom have cleared the Touch Frequency Filter. Whether you choose to send (launch) surveys every day, week or month, you will engage the correct sample of customers, without over-touching them.

CAVEAT: If you use more than one email address for the same contact, LoyaltyLoop will treat each email as a unique contact, and that customer could receive more than one survey in a narrow window if one transaction referenced one email address, and another transaction soon after, referenced a different email address.