UPDATE - Alerts & Notifications
Notices made easy - plus new features for Admin Users
We've introduced a new, easier, and more secure way of configuring your alerts and notifications, collectively referred to as "notices" throughout this post. This update applies to both Basic and Promoter plan subscribers.
What Changed and Why?
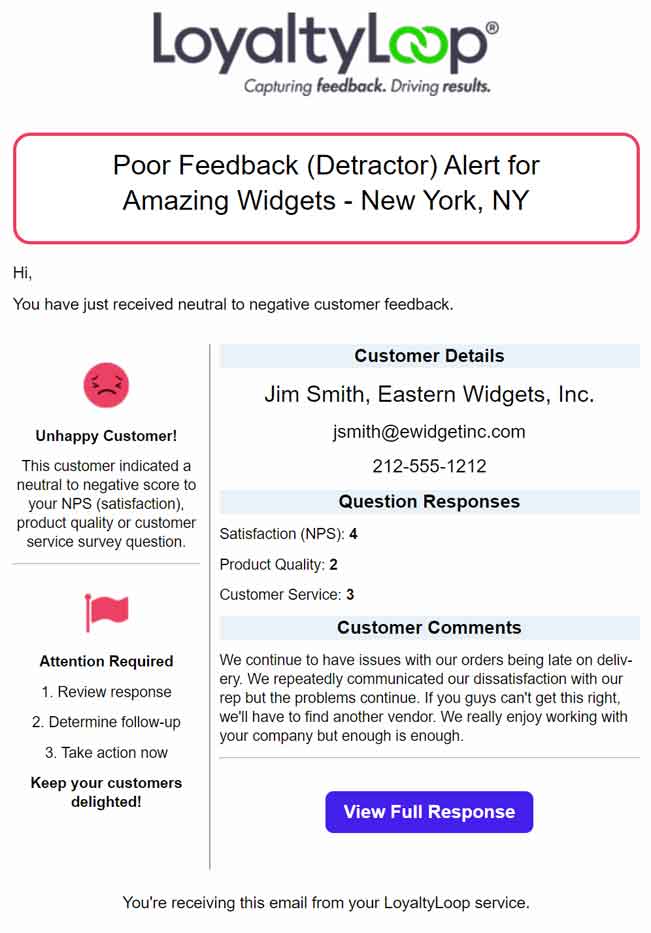
Prior to this update, every User could enter any email address in their Alerts & Notifications settings to have notices sent to that contact. Most Users entered their own email address but could add anyone.
While the capability of sending notices to anybody, even non-Users of your account and contacts outside your company, is a great benefit, we've added extra security by limiting this feature to only Admin Users.
Changes for all Users
The system now makes this very simple for all Users to set their personal notices. Sign in, go to Settings, and click Alerts & Notifications. For Users with access to more than one location, first click the location you wish to set.
All notices available for your plan are shown, each with its own controls. If you wish to receive the notice, flip its Active switch to the right. If you don't want to receive the notice, flip its Active switch to the left. That's it. All notices are sent to the email address that is your LoyaltyLoop Username.
If you cannot set the switches, that means your Admin has chosen to control the notices you receive. Please contact your Admin to request a change. Read-Only Users have no visibility to the notices they are set to receive. Admin Users control the notices sent to Read-Only Users.
Changes for Admin Users Only
Sending Notices to Non-Users ("Other Contacts")
Admin Users can set notices to be sent to any email address, including non-users, shared mailboxes or anyone else. If your account had non-User email addresses on your notices prior to this change, those addresses are still set to receive those notices, and all Admin Users can manage them.
To view and manage notices sent to other contacts, sign in with your Admin User account and go to your Alerts & Notifications settings for the location in question. You will see 2 sections on that page that relate to Alerts and Notifications for "other contacts". To add, edit or delete an email address for a notice to "other contacts", click the Modify icon.
Enter the email addresses for the people or groups you wish to include on this notice. Repeat that last step for each of the notices, remembering to click Save Changes after each one. To activate the notice, flip its Active switch to the right. To deactivate it, flip its Active switch to the left.
All Admin Users have access to all "other contacts".

Controlling Notices for Users
The default configuration of LoyaltyLoop allows each User to set their own alerts and notifications, with the exception of Read-Only Users who do not get notices.
With this update, Admin Users can override that default behavior and set the notices for their Users, including Read-Only Users. Note: Admin Users cannot set notices for other Admin Users.
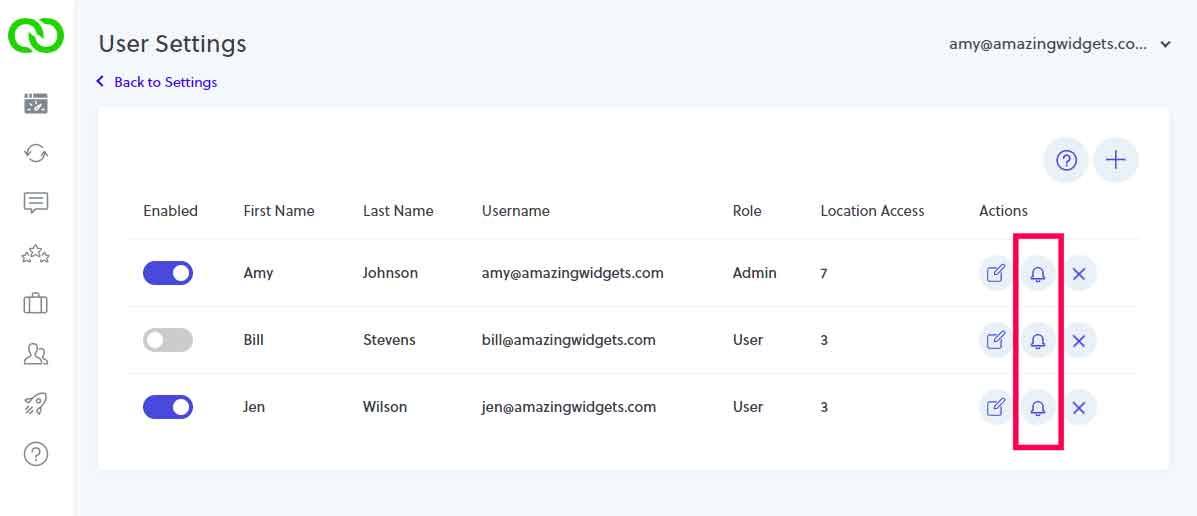
To set notices for your Users, sign in, go to Settings and then User Settings. Notice the bell icon that now appears under the Actions column next to your users. Click the bell next to the User in question, and you'll land on the screen that allows you to control that User's notices. This update makes it easy for Admins to set notices when they add new Users to their account.
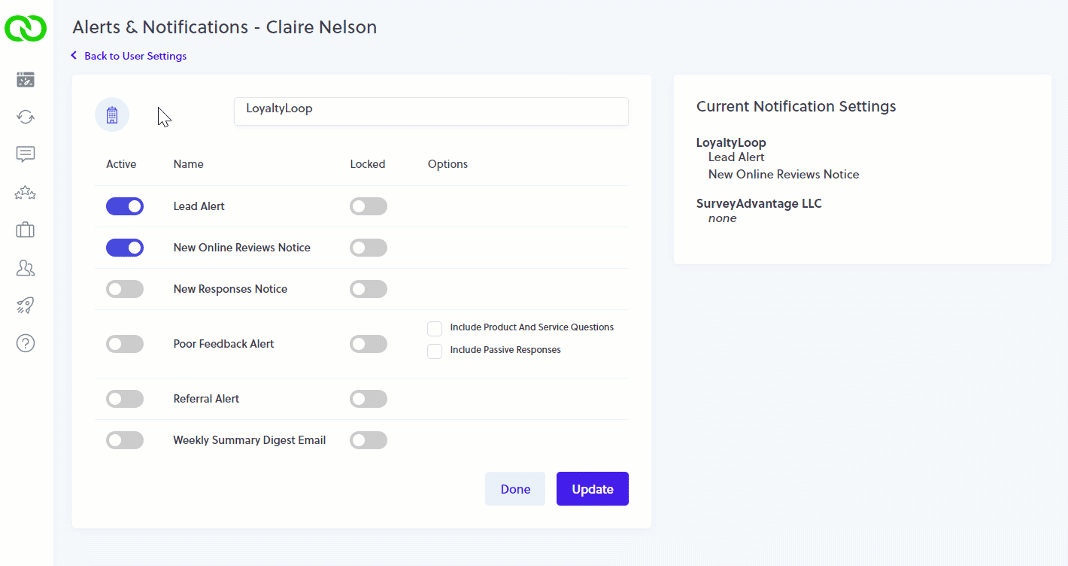
1. Setting User Notices
To set the User to receive a notice, flip that notice's Active switch to the right. If you do not want the User to receive a notice, flip the notice's Active switch to the left. When you click Update, the User's notices will be set per your selections.
For multi-location accounts, all locations to which your User has access are available to you, with the first location being selected by default. Select the location or locations for the notices you wish to set for this User, set the notices, then click Update.
The table to the right displays this User's configuration.
When your User views their Alerts & Notifications for a location, the notices you assigned will be set for their account. However, the User can still override your settings. If you wish to prevent this, read on.

2. Lock User Notices
If you wish to fully control what notices a User receives, and prevent them from changing your selections, flip the Lock switch to the right, and then Update. When your User views their Alerts & Notifications, they will see the selections you made, but they will not be able to edit them - including notices you disabled for them and locked. They will need to contact an Admin User to request a change. Since Read-Only Users do not have access to Alerts & Notifications, there's no need to Lock their settings.
Videos relating to these new features
Also available in the Help section of LoyaltyLoop