NEW - Variable Data Tags for Personalization
{{ your unique data }}
We are releasing a new feature relating to using variable data tags in all customer-facing elements of your LoyaltyLoop service. This feature is available in both Basic and Promoter plans, and is available in all signatures, emails and thank you pages.
Tags Explained: System Tags and Client Tags
To personalize your customer-facing elements, making them more relevant to your customers, it's quite handy to use variable data tags. Tags are data elements you can insert in your signatures, emails and thank you pages, that will be replaced with real data values associated with your customer launch data.
Prior to this feature release, you've likely seen tags used in your service. We had a few tags that were available, like inserting the first name of a customer to personalize the invitation email. With this release, we are expanding the capability of variable data tags. There are now 2 kinds of tags: (1) System Tags, and (2) Client Tags.
System Tags
System Tags represent data associated with the LoyaltyLoop service like signatures, survey links, and opt-out links, and are common Tags to all LoyaltyLoop subscribers.
Client Tags
Client Tags are unique to your survey, and represent the data fields you've sent to LoyaltyLoop, regardless of whether it was sent automatically via an integration or manually uploaded to Launch Pad.
NOTE: There are 4 legacy tags. They have been updated to new tags, but the legacy tags will continue to work. The
legacy tags are {{first_name}}, {{last_name}}, {{full_name}}, and {{company}}. The new
tags, in the same order are, {{FN}}, {{LN}}, {{FLN}}, and {{CMP}}.
Inserting Tags
When editing your signature, emails, and thank you pages, you'll notice two drop-down menus for each set of Tags. The plus icon ![]() is the menu for System Tags, and the tag icon
is the menu for System Tags, and the tag icon ![]() is the menu for your unique Client Tags. To insert a Tag, place your cursor in the body of the email or thank you page where you want to
tag, and then click the tag you wish to insert from the appropriate drop-down menu. The inserted tag is represented by its tag name
surrounded
by double curly brackets like
is the menu for your unique Client Tags. To insert a Tag, place your cursor in the body of the email or thank you page where you want to
tag, and then click the tag you wish to insert from the appropriate drop-down menu. The inserted tag is represented by its tag name
surrounded
by double curly brackets like {{tag_name}}.
Using Variable Data Tags in Emails and Thank You pages
The first use case for the new variable data tag feature, is adding tags in the copy of your LoyaltyLoop emails or thank you pages. While you can apply tags to both, to explain the feature let's look at an example of using them in emails. Suppose your launch data as sent to LoyaltyLoop includes fields for your invoice date, invoice number, the name of the item purchased by your customer, and the price paid by the customer for the item, as shown in the table below.
| customer_email | first_name | last_name | company | invoice_date | invoice_number | item | item_price |
| jane@anycompany.com | Jane | Doe | Any Company | 08/01/2022 | 18927 | Invisible Widget | $899.00 |
| ann@bigcompany.com | Ann | Smith | Big Company | 08/05/2022 | 18932 | Edible Widget | $699.00 |
| kent@thecompany.com | Kent | Jones | The Company | 08/15/2022 | 18954 | Fireproof Widget | $1,299.00 |
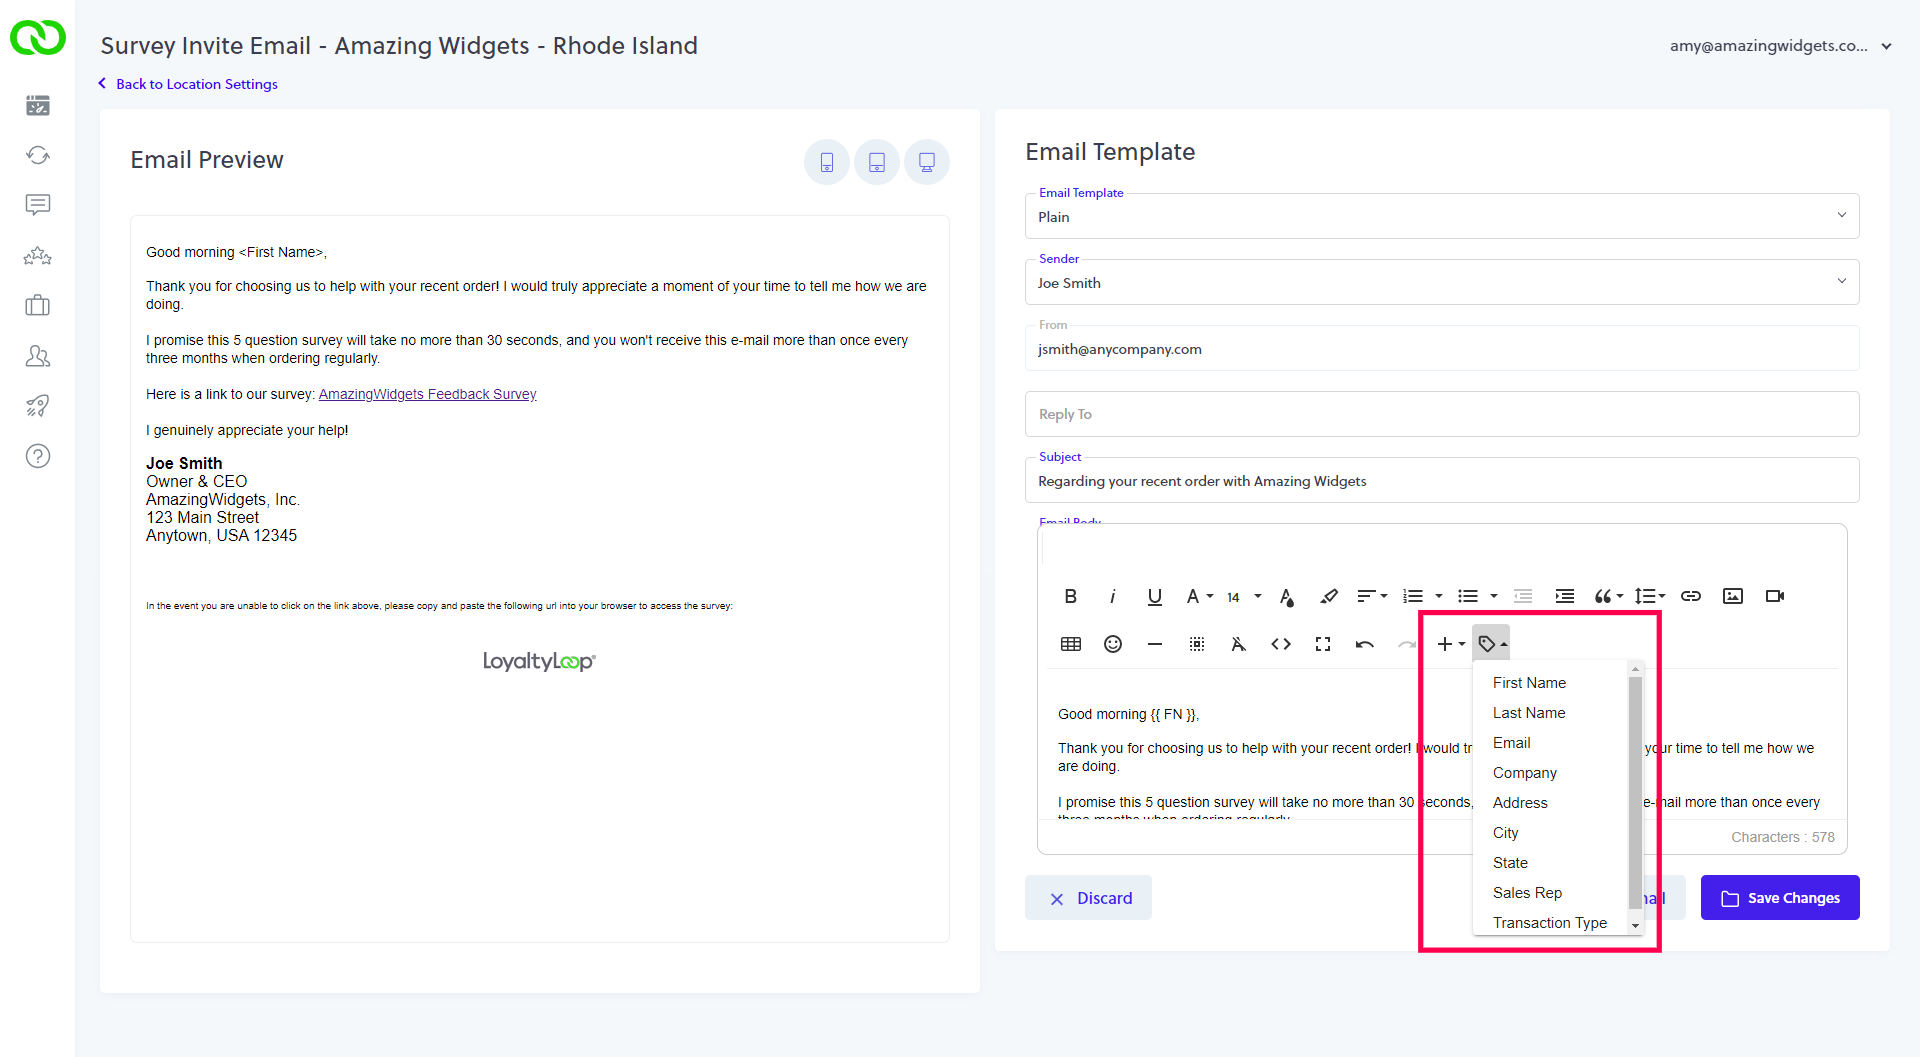
When composing your LoyaltyLoop emails, clicking the tag icon in the top menu opens a drop-down menu showing all the available Client Tags that you can insert into your email. All the data fields you send (or have automatically sent) to LoyaltyLoop will appear in this drop-down. To use tags, simply insert them in your email body or subject line.
For example, you might wish to reference the customer's invoice number in your subject line. Make your Subject read as "Requesting feedback
on {{invoice_number}}" (your actual tag name may be different than what is shown in this example). While still in the editor,
click the preview button to see what you email will look like, and tags will be shown with "friendly names" in place of the tags. At
launch, the Client Tag {{invoice_number}} will be replaced with the actual customer invoice number associated with this transaction in
your launch data.
You might also want to include a Client Tag in the body of the email. For example, you might want to word your request for feedback to reference some of these tags to further personalize the message and add context to it, like including the Client Tag for the item name or price. All of this is possible with the new variable data tags.
Remember...
If LoyaltyLoop is applying any filtering to your launch data, which is common, this will affect the data being inserted. For
example, if you transact 5 times with the same contact (email address) during the survey window, LoyaltyLoop automatically de-dupe the
contacts in order for your customer to receive only 1 request for feedback. The de-dupe process is random, hence when you insert a
variable
tag like {{invoice_number}}, it could be any one of the 5 invoices that customer received within the survey window.
Keep this in mind as you use Client Tags to personalize your emails.
Using Variable Data Tags in Signatures
In the Senders & Signatures section of Settings, you can already create email signatures, and insert them as a template
parameter, {{signature}}, into your emails. But what if you need to vary your signature based on a field in the launch data
you upload to LoyaltyLoop? This is a more advanced application of the use of tags, but is made possible with this feature release.
For example, let's suppose you have 3 locations with 3 General Managers operating each location. Now let's suppose the rows of your Launch Data include the General Manager's email, name, title, and phone for each General Manager associated with each transaction. The Launch Data might look like this.
| customer_email | first_name | last_name | company | gm_email | gm_name | gm_title | gm_phone |
| jane@anycompany.com | Jane | Doe | Any Company | bwilson@xyzcorp.com | Bill Wilson | GM, New York | 888-555-1212 |
| ann@bigcompany.com | Ann | Smith | Big Company | jscott@xyzcorp.com | Janet Scott | GM, Hartford | 800-555-1212 |
| kent@thecompany.com | Kent | Jones | The Company | tgrant@xyzcorp.com | Trent Grant | GM, Newark | 888-555-1111 |
Using variable data tags for your signatures will allow you to add these parameters into the signature, and when the survey is sent, LoyaltyLoop will insert those parameter values for each survey sent. Let's look at this example more carefully.
When composing your signature, click the tag icon in the top menu. This opens a drop-down menu of all your unique Client Tags available
when composing emails. Using the above table for this example, you would see Client Tags for {{gm_email}},
{{gm_name}}, {{gm_title}}, and{{gm_phone}}.
Simply place your cursor in the spot in the signature where you want to insert the Client Tag, and click that item from the drop-down menu. It will insert the Client Tag in that spot. You can copy/paste to move the tag around. You can even insert a variable data tag to replace the Sender's Name and Email Address, and add tags to the Subject.
Once you've saved your new signature, and you've inserted the signature tag, {{signature}} , into your emails, when your
survey launches LoyaltyLoop will replace the Client Tags with the actual values from your launch data associated with that specific
customer.
Continuing with this example, let's say we replaced Sender Name with {{gm_name}}, Sender Email Address
with{{gm_email}}, and we also insert {{gm_name}}, {{gm_title}}, and {{gm_phone}} into
the actual signature area. When LoyaltyLoop launches your survey, it will use these values from your launch data, and send the survey
invite from the email address of the GM associated with the customer's transaction, and insert that GM's personal
details in the signature.